Frequently Asked Question
PHOTOS: How do I add a photo to an Ad that has already been posted
Last Updated 7 years ago
We provide one free photograph for all ads. We ask for a small per photo fee for photos #2 through #10.
If you have already posted your Ad and there are currently no photographs on the ad, follow the instructions below.
If your ad has been posted and already includes one or more photos, and you need more photo slots than have currently been purchased, you must first Upgrade the listing to include the desire number of slots. After you check out and have paid for the upgrades, come back here and use the steps below to actually upload the photos to your ad.
Click here for instructions on how to Upgrade your ad to purchase more photo slots
All instructions assume you are using a laptop/desktop or Tablet with a larger screen, not a smartPhone. We do not recommend using a smartPhone to post or edit ads.
1) First, be sure that you have logged into your user account.
2) Go to My Account by clicking in the link in the Main Menu Bar near the top of the page, as shown below.

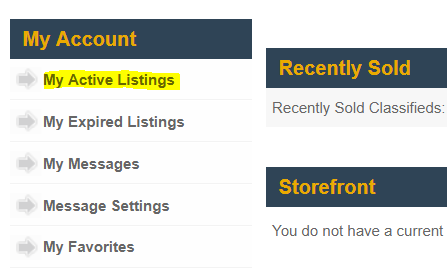
3) Once on the My Account page, click on the link for My Active Listings in the left-hand column of the page, as shown below.
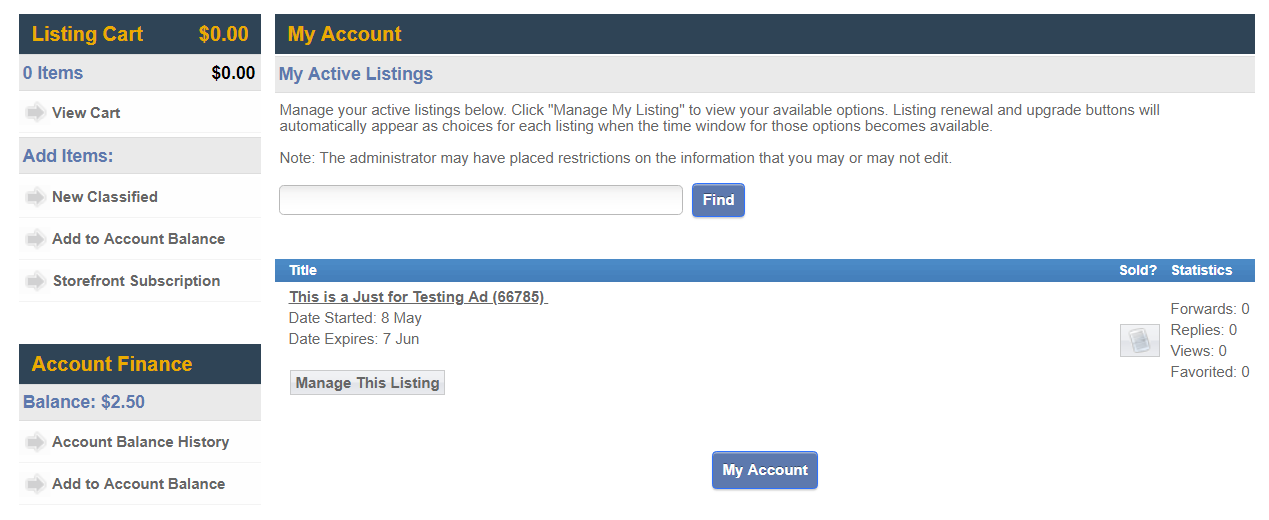
If you have any currently active listings (Ads), a summary of each will appear, as depicted below:
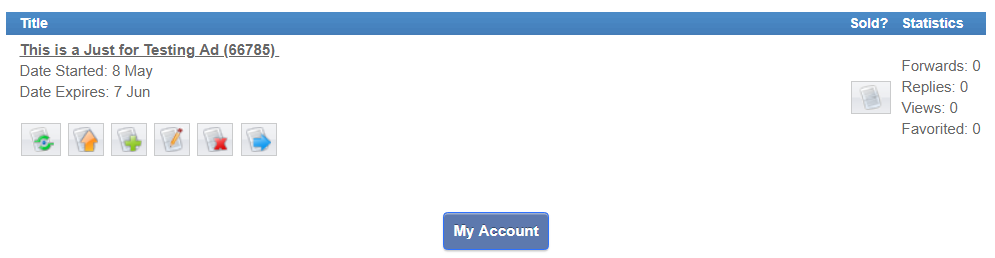
4) Now, click on the Manage This Listing button under the summary of the ad you wish to modify. This will reveal a row of icons, as shown below. You can hover your mouse pointer over each icon and a text tip balloon will appear which describes its function. For adding more photos, we want to use the EDIT function, which is the icon with the yellow pencil. Click on this icon to proceed to the next step.
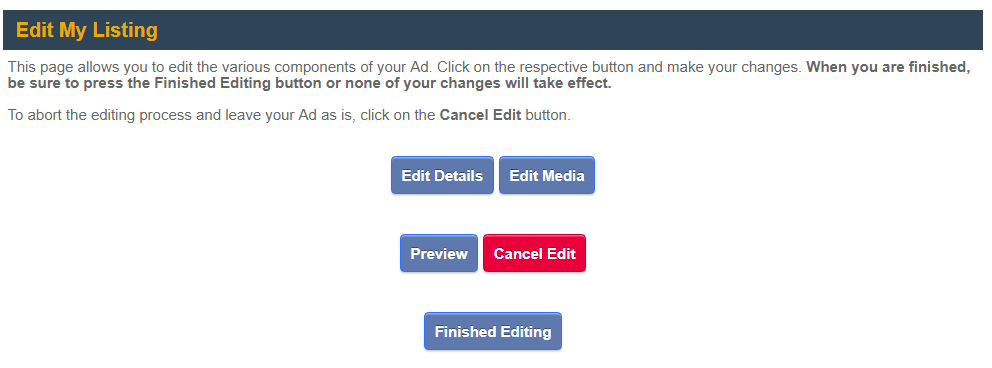
5) You are now presented with several buttons. To add, change or delete photos, you want to use the Edit Media button. If you want to change any of the details of the ad, you would use the Edit Details button. You could do one and then the other (you will come back to this page after completing each operation), and complete the edit operation by pressing the Finished Editing button.
6) After pressing the Edit Media button, you will land at the Photo Upload Page, as depicted below. Just click on the Select Files button and choose the files from your computer's disk drive that you wish to upload. You can press and hold the Control key and select multiple files.
Please note that we do not support drag and drop for this upload process.
Also, keep in mind that only the 1st photo is free. If you are trying to add more than one photo to an existing ad, you must have upgraded the ad first to allow the additional photos. Unfortunately, You can not perform that upgrade operation from this point in the process.
7) Now that you have uploaded a photo, you will see a thumbnail as depicted below. If your photo is not rotated properly, clicking on the blue semi-circle with the arrow on the end will rotate it 90-degrees in the direction indicated. Press the number of times required. IMPORTANT: If you use the rotate function, please do not use the Preview Button at the bottom of the page.
At this point you can optionally add a caption for each photo by entering text in the light gray box immediately below the thumbnail. If there is more than one photo, you can rearrange the order by changing the number in the Flie Slot or dragging the thumbnail to the desired position.
Finally, where you see "Using 1 of 1 Images" in the below example, this indicates how many photos you have been allotted and how many you actually uploaded. If you need more than you currently have allotted, you will first have to finish this process, then go and upgrade your Ad to include more photos, then finally come back and repeat the process defined in the FAQ article. We apologize for how tedious this process can be.
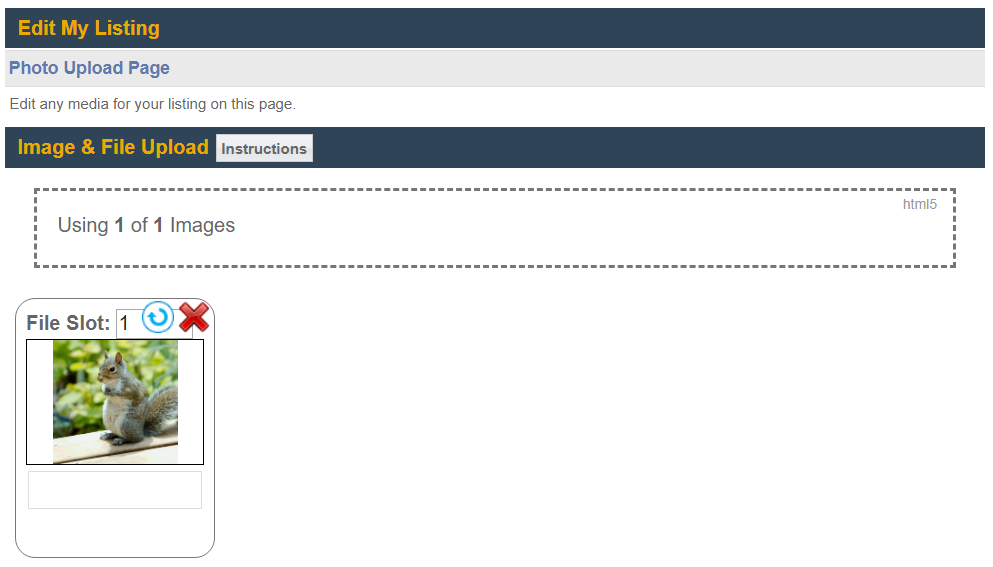
NOTE: If at this point you prefer to upload a different photo, just click on the Red arrow at the top right of the thumbnail and then repeat the upload process.
8) We are now ready to complete the process. Scroll down the page until you see a Blue and a Red button. Click on the Blue Button which reads Continue. You will land back at the page seen in step #5 above. You can now either press the Finished Editing button to complete process or go to the Edit Details to make other changes to your ad. As noted above, if you rotated your photo(s) after uploading them, please do not use the Preview button.
If you have already posted your Ad and there are currently no photographs on the ad, follow the instructions below.
If your ad has been posted and already includes one or more photos, and you need more photo slots than have currently been purchased, you must first Upgrade the listing to include the desire number of slots. After you check out and have paid for the upgrades, come back here and use the steps below to actually upload the photos to your ad.
Click here for instructions on how to Upgrade your ad to purchase more photo slots
All instructions assume you are using a laptop/desktop or Tablet with a larger screen, not a smartPhone. We do not recommend using a smartPhone to post or edit ads.
1) First, be sure that you have logged into your user account.
2) Go to My Account by clicking in the link in the Main Menu Bar near the top of the page, as shown below.
3) Once on the My Account page, click on the link for My Active Listings in the left-hand column of the page, as shown below.
If you have any currently active listings (Ads), a summary of each will appear, as depicted below:
4) Now, click on the Manage This Listing button under the summary of the ad you wish to modify. This will reveal a row of icons, as shown below. You can hover your mouse pointer over each icon and a text tip balloon will appear which describes its function. For adding more photos, we want to use the EDIT function, which is the icon with the yellow pencil. Click on this icon to proceed to the next step.
5) You are now presented with several buttons. To add, change or delete photos, you want to use the Edit Media button. If you want to change any of the details of the ad, you would use the Edit Details button. You could do one and then the other (you will come back to this page after completing each operation), and complete the edit operation by pressing the Finished Editing button.
6) After pressing the Edit Media button, you will land at the Photo Upload Page, as depicted below. Just click on the Select Files button and choose the files from your computer's disk drive that you wish to upload. You can press and hold the Control key and select multiple files.
Please note that we do not support drag and drop for this upload process.
Also, keep in mind that only the 1st photo is free. If you are trying to add more than one photo to an existing ad, you must have upgraded the ad first to allow the additional photos. Unfortunately, You can not perform that upgrade operation from this point in the process.
7) Now that you have uploaded a photo, you will see a thumbnail as depicted below. If your photo is not rotated properly, clicking on the blue semi-circle with the arrow on the end will rotate it 90-degrees in the direction indicated. Press the number of times required. IMPORTANT: If you use the rotate function, please do not use the Preview Button at the bottom of the page.
At this point you can optionally add a caption for each photo by entering text in the light gray box immediately below the thumbnail. If there is more than one photo, you can rearrange the order by changing the number in the Flie Slot or dragging the thumbnail to the desired position.
Finally, where you see "Using 1 of 1 Images" in the below example, this indicates how many photos you have been allotted and how many you actually uploaded. If you need more than you currently have allotted, you will first have to finish this process, then go and upgrade your Ad to include more photos, then finally come back and repeat the process defined in the FAQ article. We apologize for how tedious this process can be.
NOTE: If at this point you prefer to upload a different photo, just click on the Red arrow at the top right of the thumbnail and then repeat the upload process.
8) We are now ready to complete the process. Scroll down the page until you see a Blue and a Red button. Click on the Blue Button which reads Continue. You will land back at the page seen in step #5 above. You can now either press the Finished Editing button to complete process or go to the Edit Details to make other changes to your ad. As noted above, if you rotated your photo(s) after uploading them, please do not use the Preview button.